Azure Web Apps provides a highly scalable, self-patching web hosting service. This tutorial shows you how to deploy a data-driven ASP.NET web app in Azure and connect it to Azure SQL Database. When you're finished, you have a ASP.NET app running in Azure and connected to SQL Database.
In this tutorial, you learn how to:
- Create a SQL Database in Azure
- Connect an ASP.NET app to SQL Database
- Deploy the app to Azure
- Update the data model and redeploy the app
- Stream logs from Azure to your terminal
- Manage the app in the Azure portal
Prerequisites
To complete this tutorial:
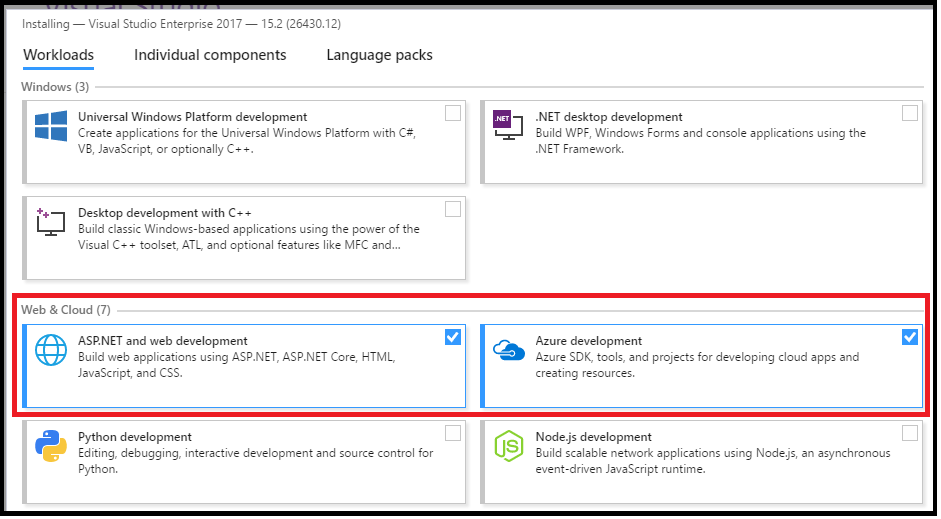
- Install Visual Studio 2017 with the following workloads:
- ASP.NET and web development
- Azure development
If you don't have an Azure subscription, create a free account before you begin.
Download the sample
Extract (unzip) the dotnet-sqldb-tutorial-master.zip file.
The sample project contains a basic ASP.NET MVC CRUD (create-read-update-delete) app using Entity Framework Code First.
Run the app
Open the dotnet-sqldb-tutorial-master/DotNetAppSqlDb.sln file in Visual Studio.
Type
Ctrl+F5 to run the app without debugging. The app is displayed in your default browser. Select the Create New link and create a couple to-do items.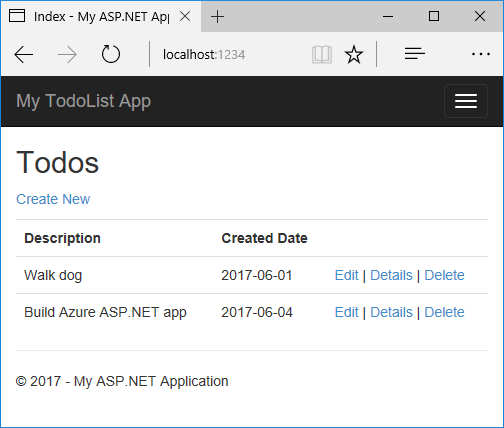
Test the Edit, Details, and Delete links.
The app uses a database context to connect with the database. In this sample, the database context uses a connection string named
MyDbConnection. The connection string is set in the Web.config file and referenced in the Models/MyDatabaseContext.cs file. The connection string name is used later in the tutorial to connect the Azure web app to an Azure SQL Database.Publish to Azure with SQL Database
In the Solution Explorer, right-click your DotNetAppSqlDb project and select Publish.

Make sure that Microsoft Azure App Service is selected and click Publish.

Publishing opens the Create App Service dialog, which helps you create all the Azure resources you need to run your ASP.NET web app in Azure.
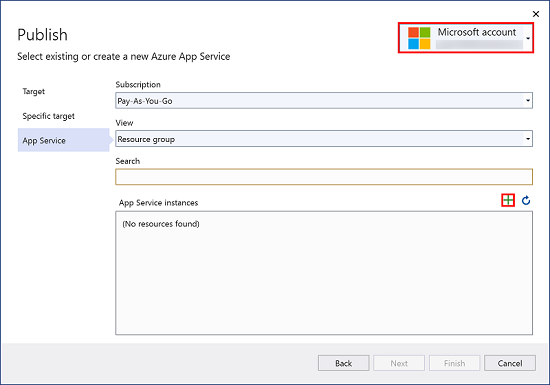
Sign in to Azure
In the Create App Service dialog, click Add an account, and then sign in to your Azure subscription. If you're already signed into a Microsoft account, make sure that account holds your Azure subscription. If the signed-in Microsoft account doesn't have your Azure subscription, click it to add the correct account.
Once signed in, you're ready to create all the resources you need for your Azure web app in this dialog.
Configure the web app name
You can keep the generated web app name, or change it to another unique name (valid characters are
a-z, 0-9, and -). The web app name is used as part of the default URL for your app (<app_name>.azurewebsites.net, where <app_name> is your web app name). The web app name needs to be unique across all apps in Azure.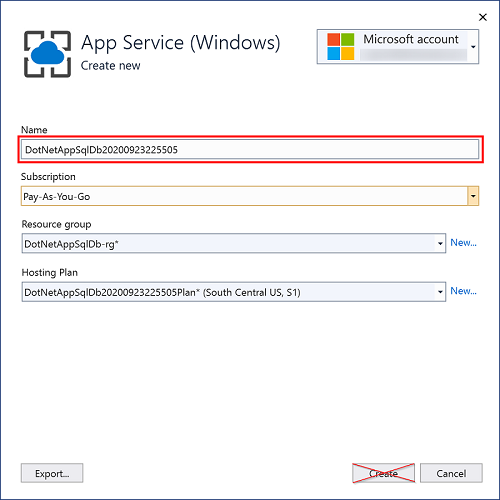
Note
Do not click Create. You first need to set up a SQL Database in a later step.
Create a resource group
A resource group is a logical container into which Azure resources like web apps, databases, and storage accounts are deployed and managed.
Next to Resource Group, click New.
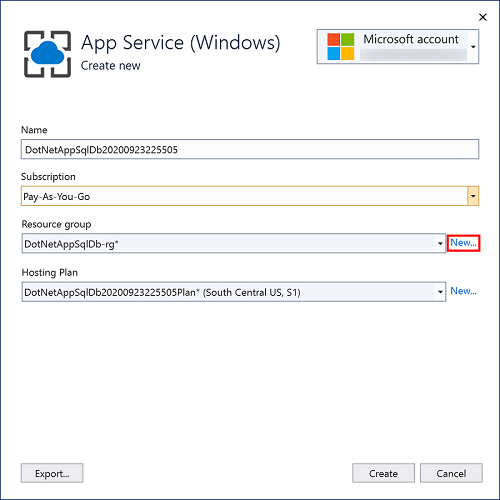
Name the resource group myResourceGroup.
Create an App Service plan
An App Service plan specifies the location, size, and features of the web server farm that hosts your app. You can save money when hosting multiple apps by configuring the web apps to share a single App Service plan.
App Service plans define:
- Region (for example: North Europe, East US, or Southeast Asia)
- Instance size (small, medium, or large)
- Scale count (1 to 20 instances)
- SKU (Free, Shared, Basic, Standard, or Premium)
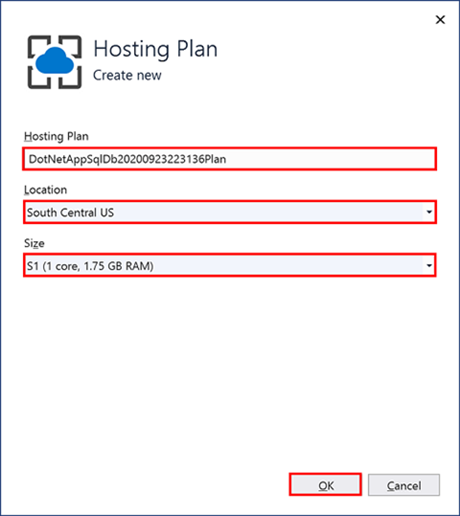
Next to App Service Plan, click New.
In the Configure App Service Plan dialog, configure the new App Service plan with the following settings:
| Setting | Suggested value | For more information |
|---|---|---|
| App Service Plan | myAppServicePlan | App Service plans |
| Location | West Europe | Azure regions |
| Size | Free | Pricing tiers |
Create a SQL Server instance
Before creating a database, you need an Azure SQL Database logical server. A logical server contains a group of databases managed as a group.
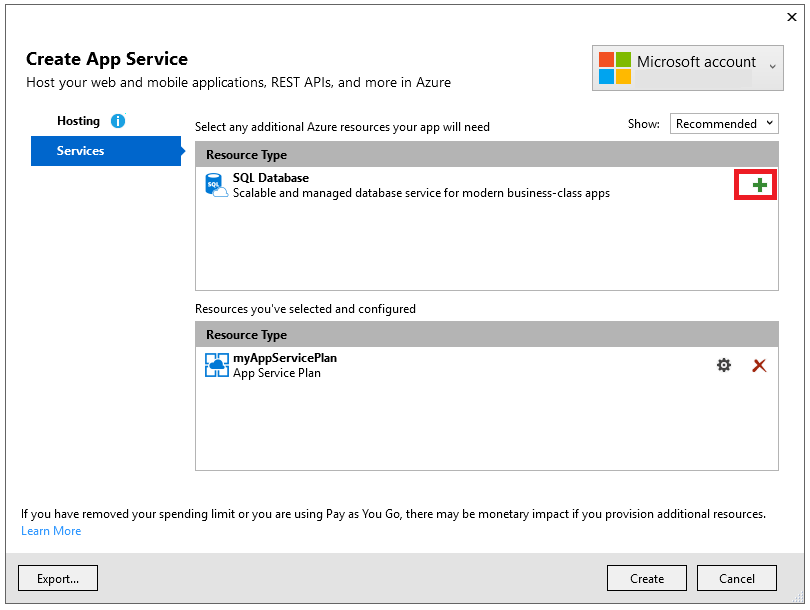
Select Explore additional Azure services.2
In the Services tab, click the + icon next to SQL Database.
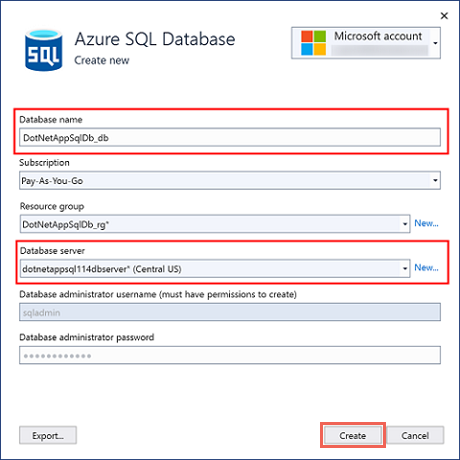
In the Configure SQL Database dialog, click New next to SQL Server.
A unique server name is generated. This name is used as part of the default URL for your logical server,
<server_name>.database.windows.net. It must be unique across all logical server instances in Azure. You can change the server name, but for this tutorial, keep the generated value.
Add an administrator username and password. For password complexity requirements, see Password Policy.
Remember this username and password. You need them to manage the logical server instance later.

Click OK. Don't close the Configure SQL Database dialog yet.
Create a SQL Database
In the Configure SQL Database dialog:
- Keep the default generated Database Name.
- In Connection String Name, type MyDbConnection. This name must match the connection string that is referenced in Models/MyDatabaseContext.cs.
- Select OK.
The Create App Service dialog shows the resources you've created. Click Create.
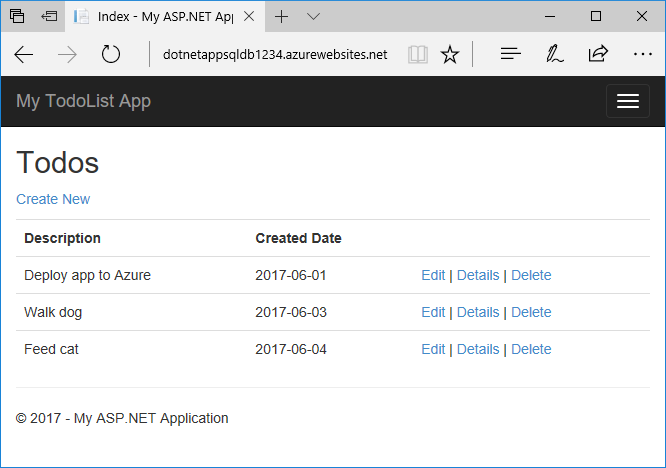
Once the wizard finishes creating the Azure resources, it publishes your ASP.NET app to Azure. Your default browser is launched with the URL to the deployed app.
Add a few to-do items.
Congratulations! Your data-driven ASP.NET application is running live in Azure App Service.
Access the SQL Database locally
Visual Studio lets you explore and manage your new SQL Database easily in the SQL Server Object Explorer.
Create a database connection
From the View menu, select SQL Server Object Explorer.
At the top of SQL Server Object Explorer, click the Add SQL Server button.
Configure the database connection
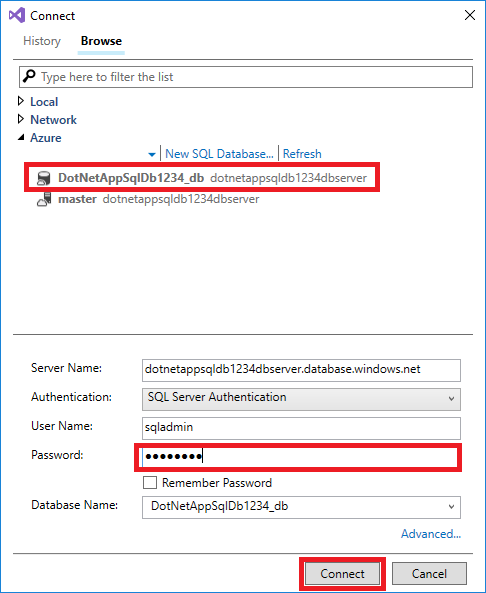
In the Connect dialog, expand the Azure node. All your SQL Database instances in Azure are listed here.
Select the SQL Database that you created earlier. The connection you created earlier is automatically filled at the bottom.
Type the database administrator password you created earlier and click Connect.
Allow client connection from your computer
The Create a new firewall rule dialog is opened. By default, your SQL Database instance only allows connections from Azure services, such as your Azure web app. To connect to your database, create a firewall rule in the SQL Database instance. The firewall rule allows the public IP address of your local computer.
The dialog is already filled with your computer's public IP address.
Make sure that Add my client IP is selected and click OK.

Once Visual Studio finishes creating the firewall setting for your SQL Database instance, your connection shows up in SQL Server Object Explorer.
Here, you can perform the most common database operations, such as run queries, create views and stored procedures, and more.
Expand your connection > Databases > <your database> > Tables. Right-click on the
Todoes table and select View Data.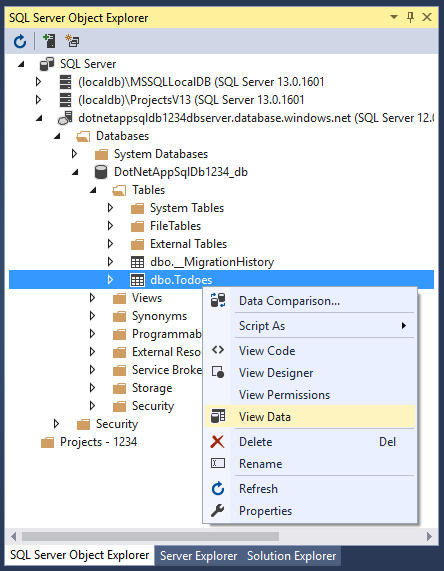
Update app with Code First Migrations
You can use the familiar tools in Visual Studio to update your database and web app in Azure. In this step, you use Code First Migrations in Entity Framework to make a change to your database schema and publish it to Azure.
For more information about using Entity Framework Code First Migrations, see Getting Started with Entity Framework 6 Code First using MVC 5.
Update your data model
Open Models\Todo.cs in the code editor. Add the following property to the
ToDo class:
C#
public bool Done { get; set; }
Run Code First Migrations locally
Run a few commands to make updates to your local database.
From the Tools menu, click NuGet Package Manager > Package Manager Console.
In the Package Manager Console window, enable Code First Migrations:
PowerShell
Enable-Migrations
Add a migration:
PowerShell
Add-Migration AddProperty
Update the local database:
PowerShell
Update-Database
Type
Ctrl+F5 to run the app. Test the edit, details, and create links.
If the application loads without errors, then Code First Migrations has succeeded. However, your page still looks the same because your application logic is not using this new property yet.
Use the new property
Make some changes in your code to use the
Done property. For simplicity in this tutorial, you're only going to change the Index and Create views to see the property in action.
Open Controllers\TodosController.cs.
Find the
Create() method on line 52 and add Done to the list of properties in the Bind attribute. When you're done, your Create() method signature looks like the following code:
C#
public ActionResult Create([Bind(Include = "Description,CreatedDate,Done")] Todo todo)
Open Views\Todos\Create.cshtml.
In the Razor code, you should see a
<div class="form-group"> element that uses model.Description, and then another <div class="form-group"> element that uses model.CreatedDate. Immediately following these two elements, add another <div class="form-group"> element that uses model.Done:
C#
<div class="form-group">
    @Html.LabelFor(model => model.Done, htmlAttributes: new { @class = "control-label col-md-2" })
    <div class="col-md-10">
        <div class="checkbox">
            @Html.EditorFor(model => model.Done)
            @Html.ValidationMessageFor(model => model.Done, "", new { @class = "text-danger" })
        </div>
    </div>
</div>
Open Views\Todos\Index.cshtml.
Search for the empty
<th></th> element. Just above this element, add the following Razor code:
C#
<th>
    @Html.DisplayNameFor(model => model.Done)
</th>
Find the
<td> element that contains the Html.ActionLink() helper methods. Above this <td>, add another <td> element with the following Razor code:
C#
<td>
    @Html.DisplayFor(modelItem => item.Done)
</td>
That's all you need to see the changes in the
Index and Create views.
Type
Ctrl+F5 to run the app.
You can now add a to-do item and check Done. Then it should show up in your homepage as a completed item. Remember that the
Edit view doesn't show the Done field, because you didn't change the Edit view.Enable Code First Migrations in Azure
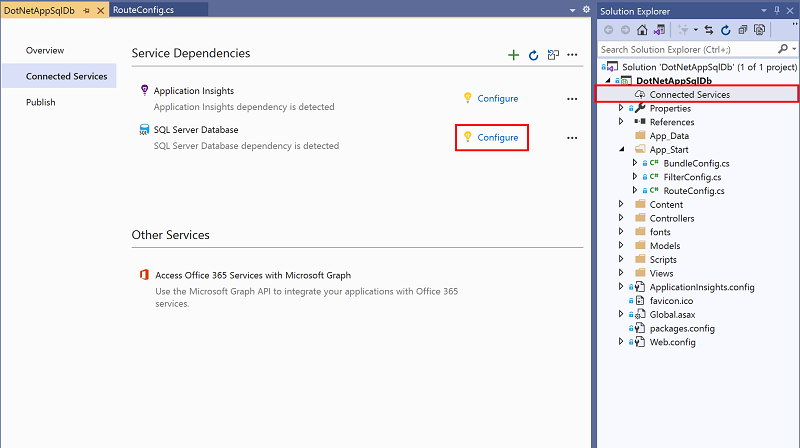
Now that your code change works, including database migration, you publish it to your Azure web app and update your SQL Database with Code First Migrations too.
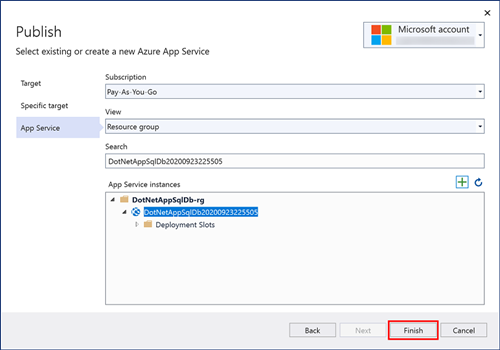
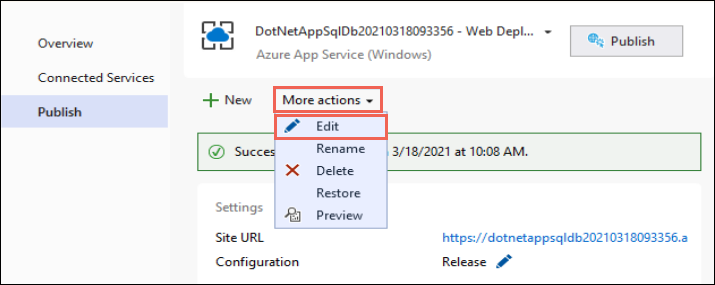
Just like before, right-click your project and select Publish.
Click Settings to open the publish wizard.
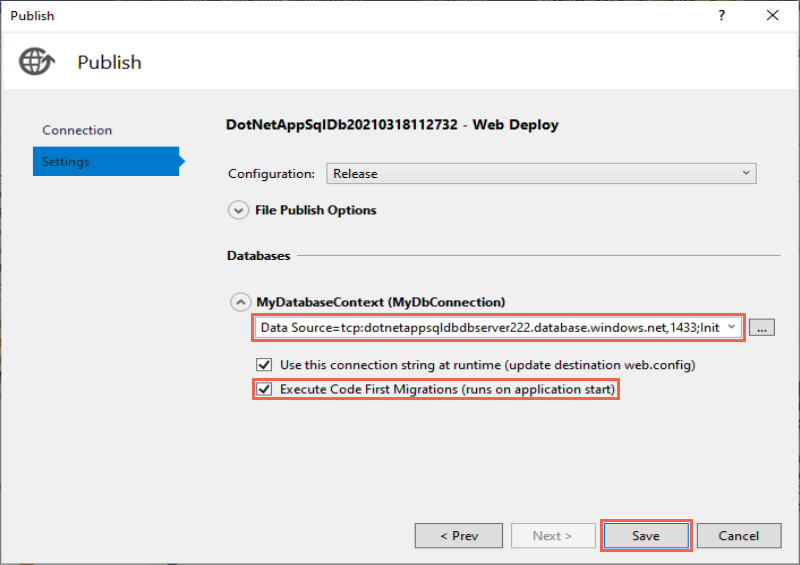
In the wizard, click Next.
Make sure that the connection string for your SQL Database is populated in MyDatabaseContext (MyDbConnection). You may need to select the myToDoAppDb database from the dropdown.
Select Execute Code First Migrations (runs on application start), then click Save.
Publish your changes
Now that you enabled Code First Migrations in your Azure web app, publish your code changes.
In the publish page, click Publish.
Try adding to-do items again and select Done, and they should show up in your homepage as a completed item.
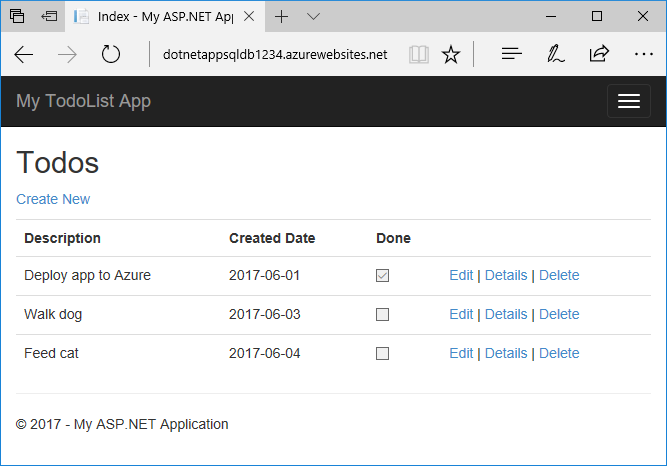
All your existing to-do items are still displayed. When you republish your ASP.NET application, existing data in your SQL Database is not lost. Also, Code First Migrations only changes the data schema and leaves your existing data intact.
Stream application logs
You can stream tracing messages directly from your Azure web app to Visual Studio.
Open Controllers\TodosController.cs.
Each action starts with a
Trace.WriteLine() method. This code is added to show you how to add trace messages to your Azure web app.Open Server Explorer
From the View menu, select Server Explorer. You can configure logging for your Azure web app in Server Explorer.
Enable log streaming
In Server Explorer, expand Azure > App Service.
Expand the myResourceGroup resource group, you created when you first created the Azure web app.
Right-click your Azure web app and select View Streaming Logs.
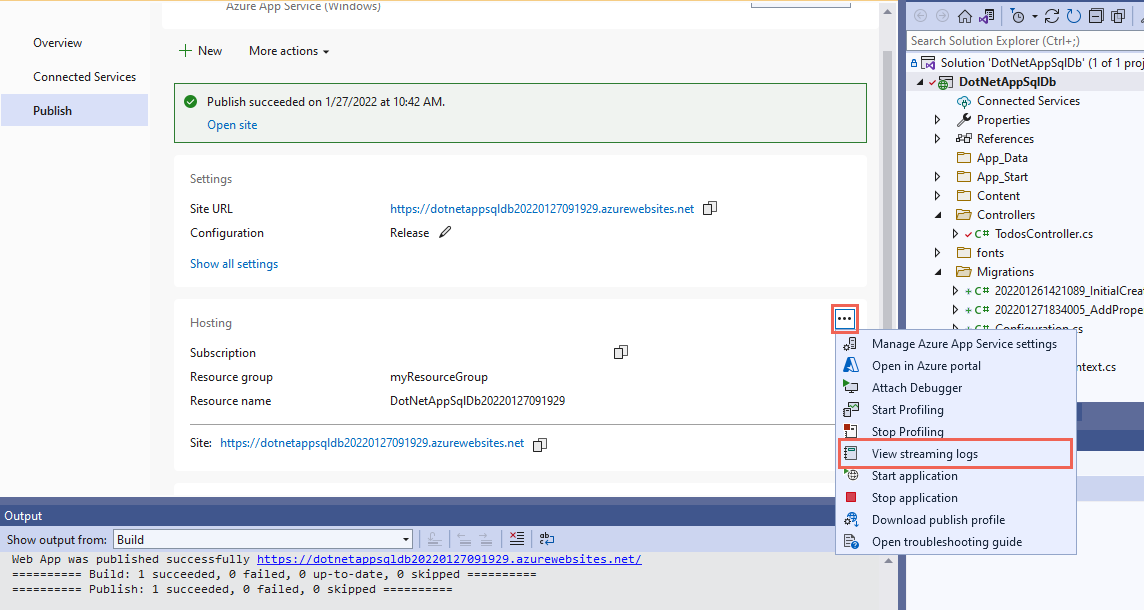
The logs are now streamed into the Output window.
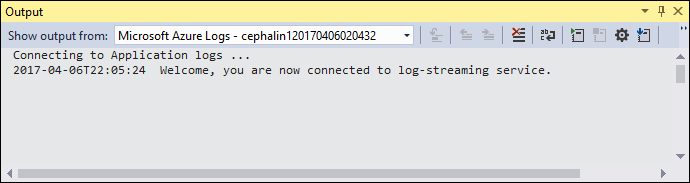
However, you don't see any of the trace messages yet. That's because when you first select View Streaming Logs, your Azure web app sets the trace level to
Error, which only logs error events (with the Trace.TraceError() method).Change trace levels
To change the trace levels to output other trace messages, go back to Server Explorer.
Right-click your Azure web app again and select View Settings.
In the Application Logging (File System) dropdown, select Verbose. Click Save.

Tip
You can experiment with different trace levels to see what types of messages are displayed for each level. For example, the Information level includes all logs created by
Trace.TraceInformation(), Trace.TraceWarning(), and Trace.TraceError(), but not logs created by Trace.WriteLine().
In your browser navigate to your web app again at http://<your app name>.azurewebsites.net, then try clicking around the to-do list application in Azure. The trace messages are now streamed to the Output window in Visual Studio.
console
Application: 2017-04-06T23:30:41  PID[8132] Verbose     GET /Todos/Index
Application: 2017-04-06T23:30:43  PID[8132] Verbose     GET /Todos/Create
Application: 2017-04-06T23:30:53  PID[8132] Verbose     POST /Todos/Create
Application: 2017-04-06T23:30:54  PID[8132] Verbose     GET /Todos/Index
Stop log streaming
To stop the log-streaming service, click the Stop monitoring button in the Output window.

Manage your Azure web app
Go to the Azure portal to see the web app you created.
From the left menu, click App Service, then click the name of your Azure web app.

You have landed in your web app's page.
By default, the portal shows the Overview page. This page gives you a view of how your app is doing. Here, you can also perform basic management tasks like browse, stop, start, restart, and delete. The tabs on the left side of the page show the different configuration pages you can open.

Clean up resources
In the preceding steps, you created Azure resources in a resource group. If you don't expect to need these resources in the future, you can delete them by deleting the resource group.
- From your web app's Overview page in the Azure portal, select the myResourceGroup link under Resource group.
- On the resource group page, make sure that the listed resources are the ones you want to delete.
- Select Delete, type myResourceGroup in the text box, and then select Delete.
Next steps
In this tutorial, you learned how to:
- Create a SQL Database in Azure
- Connect an ASP.NET app to SQL Database
- Deploy the app to Azure
- Update the data model and redeploy the app
- Stream logs from Azure to your terminal
- Manage the app in the Azure portal +
Advance to the next tutorial to learn how to map a custom DNS name to the web app.
https://docs.microsoft.com/en-us/azure/app-service/app-service-web-tutorial-dotnet-sqldatabase